| Community for Overseas Chinese - WOWchinese | Chat Information for WOWchinese | History and Information about Overseas Chinese |
Basics on Editing Digital Photographs
CONTENTS
- 0 Introduction
- 1 The Monitor
- Dot Pitch
- Resolution
- White Point
- Gamma Correction
- 2 Image Management
- PhotoGenetics
Picture Window
Photoshop - 3 Photo-editing Software
- 4 Saving Images
- Source Formats
Working Formats
Output Formats - 5 Sharpening Images
- 6 Resizing Images
- 7 Cropping Images
- 8 Rotating Images
- 9 Changing Brightness and Contrast
- 10 Adjusting Color Balance
- 11 Saturation
- 12 Using Filters
- 13 Composite Imaging
- 14 Understanding Histograms
0 Introduction
In a traditional darkroom, you control images with choices of films, chemicals, papers and processes. In the digital equivalent of the darkroom, you do so with a computer system and a photo editing program. Just as in a traditional darkroom, the quality of your digital tools has an impact on the quality of your images.
However, a digital darkroom isn't like a traditional darkroom. For one thing, the lights are on. For another there is no prep time, so you can work only as long as you want. Costs are also lower because you can experiment and try things without wasting time and materials. If you make any really serious mistakes, you can always use the undo command.Digital images can be edited in a wide variety of ways using photo-editing software. In some cases an editing program is used to "improve" an image by eliminating or reducing its flaws. In other cases it is used to take an image to a new place, making it something it never was.
1 The Monitor
Larger displays from recognized manufacturers will give you better results, because they allow you to better see on the screen what you'll get in a printout. They also support a wider range of resolutions.
 |
This Apple ColorSync Display provides a 20-inch screen (19.02-inch diagonal viewable image size). It's the ideal choice for anyone whose work demands resolution flexibility, color accuracy, and a full two-page display for detailed documents. |
Dot Pitch
All CRT displays use an electron beam that scans the screen which is covered with dots of colored phosphor. Between the electron gun and the screen is a mask that allows the sweeping beam to strike the screen only in selected areas (pixels). There are two kinds of masks; shadow masks and slot masks.
- A shadow mask is a screen drilled with holes.The closer these holes are together in this screen, the higher the screen's resolution.
- A slot mask (or aperture grill), like those in Sony Trinitron tubes, uses slots cut in the plate instead of round holes.
The spacing between the center of one dot or slot of the same color is called the dot pitch and is given in millimeters. The closer these are together, the better the screen's? display (all other things being equal). The images are crisper and edges and lines look smoother. To compare monitors with the different types of masks, you need to know that the numbers are not equivalent. For example, a monitor using a shadow mask and having a dot pitch of .27mm is about the same as a .25 mm dot pitch on a monitor using a slot mask. You can determine a monitor's maximum resolution by dividing its width by its dot pitch. For example, a 14", .28mm dot pitch monitor measuring 300mm across could clearly display 1071 dots.
Dot pitch isn't a reliable measure of monitor quality because it's often distorted by different measurement techniques. Some monitors, such as the Sony Trinitron, use stripes instead? of dots so there is no comparable measurement.
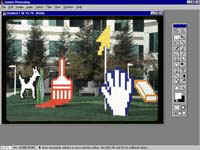
On any given monitor, changing screen resolutions changes the size of displayed objects such as icons, text, buttons, and images. As the resolution increases, object sizes decrease but they do appear sharper. Take a look here at the same image displayed at three different resolutions: 640 x 480, 600 x 800, and 1024 x 768.
 |
 |
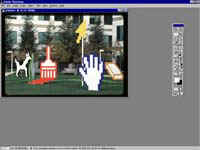 |
| 640 x 480. At this resolution, Photoshop fills the screen. | 800 x 600. When the screen resolution is increased, Photoshop gets smaller. | 1024 x 768. When the resolution is increased again, Photoshop gets even smaller. |
Because higher resolutions make things smaller on the screen, not all screen resolutions on a given sized screen make for comfortable viewing. For example, a screen resolution of 1024 x 768 on a 14" monitor makes text too small to be easily read. On the other hand, using a resolution of 640 x 480 on a 21" monitor makes things unreasonably large for those with normal vision (but like a large-print edition for folks with vision problems). Here is a table that you can use as a guideline when selecting a monitor or changing the resolution of the one you have.
| Resolution | Monitor Size |
||||
| 14 | 15 | 17 | 20 | 21 | |
| 640 x 480 | X | ? | ? | ? | ? |
| 800 x 600 | X | X | ? | ? | ? |
| 1024 x 768 | ? | X | X | X | ? |
| 1280 x 1024 | ? | ? | ? | X | X |
| 1600 x 1200 | ? | ? | ? | ? | X |
Light sources have different color temperatures. When you set up your monitor, you can adjust its "white point" which is another name for its color temperature. The monitor's white point has a big effect on how the image looks on the screen. It's best to match it to the way you'll finally output the image so you can preview the end results better. If your images will be displayed on a monitor set it to 9300K, and if they are to be displayed on a TV set it to 6500. If they are to be printed, set it to 5000.
| Source Color ?? | Temperature |
| Computer monitor?? | 9300K (adjustable) |
| Average daylight?? | 6500K |
| Television monitor?? | 6500K |
| Cool white fluorescent ?? | 4300K |
| Tungsten lamp?? | 2800K |
| Sunlight at sunset?? | 2000K |
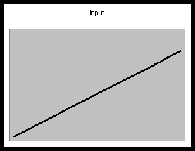
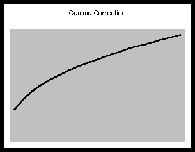
The image sensor in a digital camera is a linear device�Xthe output signal is directly proportional to the scene illumination and exposure�Xdoubling the exposure doubles the output signal. However, the phosphors that are used to make display monitors are non-linear. Typically, the phosphors have less gain for dark signals and more gain for bright signals. As the input voltage is increased, the screen brightness doesn't change smoothly because it's affected by electrostatic effects in the electron gun. This means that if you input a linear signal, the display on the screen is nonlinear and images tend to be darker with detail lost in the shadow areas.To compensate for this, the monitor adjusts the input signal to boost the dark areas and reduce the light ones. This ensures that combination of camera and monitor working together produce a linear effect. This process of adjusting the incoming signal is called Gamma correction. The term Gamma comes from the fact that the screen's brightness is proportional to the input voltage raised to the power 2.5, or gamma.
 |
 |
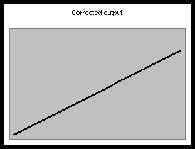
| Input Image | Uncorrected output image |
To make the displayed image better match the original image, the input signal can be adjusted to distort the signal in the opposite direction from the distortions of the CRT. For example, if the original image has a middle gray tone, the correction lightens it. When it's then displayed on the screen, the CRT darkens it again, bringing it back to middle gray. This adjustment is called gamma correction. Gamma correction controls the overall brightness of an image and images that haven't been properly corrected will look too light or too dark. Varying gamma also affects colors by changing the ratios of red, green, and blue. For this reason, you need to correct it to accurately reproduce colors.
Most monitors have a gamma of about 2.5. In the art below you'll see that a CRT with a gamma of 2.5 has a response like the one shown in the top two charts. In the bottom three charts you see what happens to the output signal when the input signal is first corrected.
Although gamma correction sounds technical, it's important if you want images displayed accurately on your screen or if you want to post images on the Web and have them displayed correctly on other people's screens.
Input |
Gamma Correction |
Output |
 |
None |
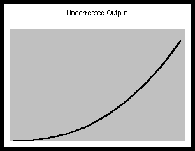 |
| 1. The input curve is straight and linear. | 2. No gamma correction is used. | 3. The output curve is distorted. |
 |
 |
 |
| 1. The input curve is straight and linear. | 2. Gamma correction adjusts the input in such a way that it compensates for the distortion. | 3. The output curve is straight and linear. |
2 Image Management
It doesn't take long to be overrun with images; and all of them with meaningless names to boot. The problem is that if you can't find them, you can't use them. In this topic we explore some of the software tools designed to help you find, identify, organize, and use the images you have take. There is a spectrum of image management software ranging from programs that just transfer images from the camera to the computer to those that manage huge collections of images. Here are just some of the things these programs can do:
- Acquire images from the camera
- View the images on the system
- Catalog the images, usually using thumbnails
- Edit the images
- Post thumbnails of the images on the Web
It pays to look at these programs because it sometimes seems like the software that comes with your camera was written by Martians. The programmers frequently ignore the most common Windows or Macintosh assumptions so the programs look and act strange to many users. In addition, they crash or hang systems all too often. A number of third-party products have been developed to fill the vacuum created by these half-hearted efforts on the part of the camera manufacturers. Here are some of those, and much, much, more.
 |
| The ThumbsPlus screen display. |
No hard drive is large enough to permenantly store all of the images an active digital photographer takes over the years. At some point, the images have to be moved to a less expensive and more permanant storage media, usually CD-R discs but eventually DVD discs or some other unforseeen media. Once you have a collection of removable disks, the cataloging and locating problem increases dramatically. Imaging looking through 20 or more Cds for an image! It's boring, time consumming, and a waste of time. To speed things along, you need a comprehensive database of all of your images in one place. Then when you search or browse that database, it tells you what disc the image you want is on. The database creates thumbnail images for photos or the first frame for movies and contains fields for descriptive material such as file format, image size, camera used, and so on. Some of these fields are filled-in automatically from data stored in the image file. For example, camera that use the Exif file format store information about images and the camera that took them such as shutter speed, aperture, and focal length. Other fields are blank unless you type something in such as keywords or descriptions. The more information you have, the easier it will be to find the image later. The iumages are not stored in the database but the database contains pointers to where they are located. The images are in their own files on discs or other media. When you search or browse the database, a grid of thumnails is usually displayed so you can look through those images that match your search criteria or all of the images in the database. When you find one you want, the database indicates where it is stored.
You can have one database for all of your disks, or create smaller databases for each disk and store them on the diak along with the images.
Canto's Cumulus (for Mac and PC) catalogs your digital images and other digital files (called assets) including text files, QuickTime movies, GIF images, or MP3 files. It stores details about these files in a searchable database. The database stores information such as file format, resolution, dimension, file size, creation and modification dates, the original's location, and your own comments. The program can catalog files located on your hard drive, elsewhere on your network, or on removable media such as CD discs. When you search for files you query the database using familiar database features such as Boolean operators (AND, OR, NOT). details about each file matching your criteria is displayed along with a thumbnail image if they are photos.
- Customize previews, records and categories
- Attach voice annotation to assets
- Create multimedia slide shows and output them to a QuickTime movie
- Publish assets to HTML pages that display thumbnail images and whatever other information you want added for each image. You can post these pages on the Web or copy them to a CD so others can see your work. The Browser is a royalty-free program for browsing assets on CDs, cartridges and other removable media.
- On the fly e-mail assets and slide shows
The basic Cumulus program is quite inexpensive. However, Canto sells optional packages that can significantly increase it's price.?
Editing Digital Photographs
3 Photo-Editing Software
Photo-editing software ranges from easy to use, one-click corrections, to the powerful and complicated Photoshop. Where you want to place yourself along this spectrum depends a lot on how serious you are and what you want to accomplish. For example, if all you want to do is prepare images to post on the Web, a shareware program such as Paint Shop Pro will more than suffice. However, if you plan on having your images printed on a color press or included in a professionally produced publication, then Photoshop is the way to go.
QBeo��s PhotoGenetics? takes an innovative new approach to improving your images. Instead of offering hundreds, or thousands of commands, it lets you compare your image to automatically generated variations that have been modified in one respect or another by the program. When you rate the variation from "a little better" than the original to "a lot better," the variation's enhancements are automatically applied to your image. If you rate a variant as "not better," the suggested changes are discarded and a new variant is generated. You can then compare the revised original to a new variation and rank it. After a few generations of ranking variations, you'll find you have the image you've been looking for. What's more, you can store your enhancements separately and quickly apply them to images in the future.
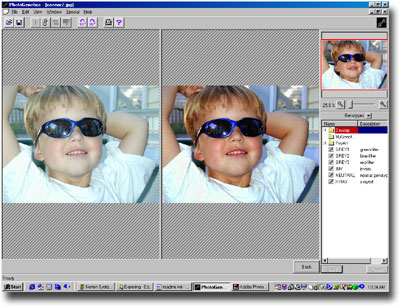 |
The PhotoGenetics screen always shows you the currently corrected original image (left) and a variation (right). When you score the variation, its attributes are applied to the original image. |
There is always a tendency to think that "degree of difficulty" is a signature of power and quality. Things that are harder to use must be better. This is probably because we have a Puritan ethic that says we have to work hard for what we get. However, it doesn't have to be that way. The complexity of even the most powerful technologies can be hidden behind an easy-to-use user interface. One example of this is your digital camera. Every time you press that shutter button, millions, or even billions of activities take place inside the camera at the speed of light. If digital cameras were as hard to learn or use as most photo-editing programs, no one would be using them.
QBeo's PhotoGenetics? is like your camera; powerful in concept and operation, but easy to use. Kodak had a great slogan at the beginning of of the last century that went, "You click the button, we do the rest." Well, that's what PhotoGenetics does. When you rate a proposed variation, the program immediately performs complex adjustments to a dozen image characteristics such as color balance, gamma, gradient, curve, saturation and hue. You don't need to know what these characteristics are, let alone how they are adjusted or interact. You just use your visual sense to make improvements.
 |
 |
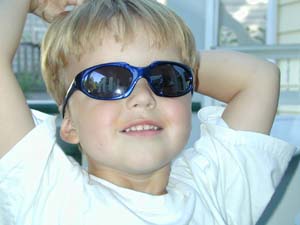
| Before PhotoGenetics | After PhotoGenetics |
At the moment the are also three PhotoGenetics Add-ons that expand the range of the program's capabilities.
- Isocolor Evolution lets you modify tone and some other qualities of a certain color (and all similar colors) in an image. You may shift the tone of a color and make it look more brilliant or less colorful and darker or paler. The Isocolor Evolution is the new tool that helps you evolve certain colors of an image into a specific direction or give them a specific character.
- Artistic Evolution uses a high mutation rate to generate unbelievable effects and strange modifications of your images. At the end your photo may look like a sketch or a painting in some strange artistic style or like a landscape seen through the eyes of an alien.
- Dewarp Evolution corrects for barrel distortions of wide angle snapshots has been an important function of PhotoGenetics from the beginning. With this new tool the user of PhotoGenetics can now correct the distortion of any individual image by a special kind of evolution. He can also produce his own dewarp genotypes which are adapted to his specific camera, different zoom settings and additional wide angle lenses.
Picture Window is an editing program developed specifically for photographers. It lets you enhance your photos using powerful image editing tools, and then create high quality prints, multimedia slide shows, photo screen savers, and much more. Unlike many expensive image editing programs designed for professional graphic artists and illustrators, Picture Window was created expressly for serious amateur photographers who want more creative control over their images and for professional photographers who want to expand their business by offering digital image processing services at affordable prices. If you're a photographer, you'll find Picture Window uses familiar terms and techniques, and lets you do perspective correction, color balancing, retouching, and tonal adjustments quickly and easily.
Picture Window's image editing tools are extremely powerful, yet easy to use. Their heavily illustrated "plain English" manual gets you productive quickly. And Picture Window has enough depth of features to handle almost any image editing task, no matter how complicated. Here are just a few of the things you can do:
|
|
4 Saving Images
Most digital cameras store images in one of three formats: JPEG, TIFF, or CCD RAW. When you open these images to work on them, you can, and often should, save them in another format.
Source Formats
When you take photos, they are stored on your camera's storage device in one of the following formats.
JPEG
The JPEG (Joint Photographic Experts Group) format, pronounced "jay-peg," is by far the most popular format for display of photographic images on the Web. The term "JPEG" is often used to describe the JFIF file format (JPEG File Interchange Format). JFIF is the actual file format that contains an image compressed with the JPEG method. These newer JFIF files originally used the JPG extension, however, the latest standard calls for using a JIF extension instead. The format is optimized for the display of photographs and doesn't work as well as GIF for type or line drawings (GIF is optimized for those). JPEG images have two distinctive features:
- JPEG uses a lossy compression scheme but you can vary the amount of compression and hence trade off file size for image quality, even making extremely small files with poor quality.
- JPEG supports 24-bit color. GIF, the other format widely used on the Web supports only 8-bits.
Compression is performed on blocks of pixels eight on a side. You can see these blocks when you use the highest levels of compression or greatly enlarge the image. JPEG is a two pass compression and de-compression algorithm. This means it take longer to load and display than a gif file. You can save images in a progressive JPEG format that works somewhat like an interlaced GIF. While a standard JPEG? loads from top to bottom, a progressive JPEG displays the entire image starting with the largest blocks. This allows the image to be displayed first in low-resolution and then filled in as more data arrives. When you save an image in this format, you can specify the number of progressive scans. Don't use JPEG to save original images you expect to modify later. Every time you open one of these files, and then save it again, the image is compressed. As you go through a series of saves, the image become more and more degraded. Be sure to save your originals is a loss-free format such as TIFF or BMP at maximum color depth. Also, when you save an image as a JPEG, the image on the screen won't reflect the compression unless you load the saved version.
TIFF
TIFF (Tag Image File Format), pronounced "tiff," was originally developed by Aldus Corporation to save images created by scanners, frame grabbers, and photo editing programs. This format has been widely accepted and widely supported as an image transfer format not tied to specific scanners, printers, or computer display hardware. TIFF is also a popular format for desktop publishing applications. There are several variations of the format, called extensions, so you may have occasional problems opening one from another source. Some versions are compressed using the LZW or other lossless methods. TIFF files support up to 24-bit colors.
CCD RAW
When an image sensor captures data for an image, some cameras allow you to save the raw, unprocessed data in a format called CCD RAW (.CRW). This data contains everything captured by the camera. Instead of being processed in the camera, where computing power and work space is limited, the raw data can be processed into a final image on a powerful desktop computer. The increased power and work space can make a significant difference in the results. In addition, you can save the raw data and process it with other software or in different ways. When the raw data is processed in the computer into a JPEG or other image, it's a "one size fits all" form of processing and the RAW data is discarded. In the final file, not only has some of the original data been changed, some has also been deleted.
Here's what Chuck Westfall, Manager/Technical Information Dept.at Camera Division/Canon U.S.A., Inc. has to say about the RAW format. "Some of the main benefits of CCD RAW files are their smaller file size written by? the camera (approximately 60% smaller than an uncompressed RGB TIFF file of? equal resolution), a potentially shorter interval between exposures, and optimum image quality due to superior image processing algorithms made possible by an? external PC. Of course, one of the main reasons for shooting CCD RAW in the? first place is to eliminate the clarity-robbing "artifacts" created by lossy? JPEG compression. As you know, Canon was among the first manufacturers to offer? an uncompressed file format as far back as 1996 with the PowerShot 600; it's? only very recently that other camera makers have begun to offer uncompressed? file formats as well. Some makers still don't.
In addition to the digitized raw sensor data, which results in 1 byte per pixel, the .CRW format also records white balance data, contrast mapping, etc. This? information is applied during signal processing to enhance color accuracy and? other aspects of image quality.
It should also be noted that current PowerShot cameras initially capture image ? data at 10 bits per channel in 4 channels (C-M-Y-G). Whereas current ? signal-processing algorithms reduce this to 24-bit RGB output (8-bits per channel), it's conceivable that, with .CRW files at least, a revised algorithm could preserve the 10-bit input data intact with no increase in initial file size. In fact, future cameras could increase the digital capture gradation from 10-bit to 12-bit or even higher, resulting in even further improvements in color quality.
To summarize, the .CRW format already offers many advantages compared to other file formats. There's also a lot of room for further improvements over time."
Working Formats
As new programs are introduced, developers have a tendency to create proprietary, or native formats that can be read only by their programs. Part of this desire is to have a competitive advantage. But there is also a need sometimes to design a new format to accommodate new procedures or possibilities. However, native formats present serious problems for users who want to transfer image files among programs and share them with others. They are often not readable by other programs.
When editing photos, you usually preserve the original file and save the one on which you're working in an uncompressed or lossless format. One such format, TIFF has already been discussed. Here is a brief discussion of some other leading file formats. None of these formats are compressed, so their file sizes are quite large compared to JPEG images.
Photoshop (.PSD)
When working on images in Photoshop, there are many features, such as layers, that serve a purpose only when editing. For this reason, Photoshop has its own native format you use to save file while working on them. This format saves everything you've done to the image so you can just reopen the file and continue working. When finished, you usually save the image in another, more common format such as TIF, JPEG, or BMP.
PICT (.PIC)
The PICT format, pronounced "pick," was introduced along with MacDraw software for the Macintosh. It has since become a Macintosh standard.
BMP (.BMP)
BMP, pronounced a letter at a time "B-M-P," files use a Windows bitmap format. These images are stored in a device-independent bitmap (DIB) format that allows Windows to display the bitmap on any type of display device. The term "device independent" means that the bitmap specifies pixel color in a form independent of the method used by a display to represent color.
Output Formats
Many digital photos end up on the Web or attached to e-mail so they are viewed on the screen. For these purposes, small files that are easy to send over the Internet are favored. The leading format for images used in these ways is JPEG, the format most often used to store captured images. However, rival formats have been developed to improve on JPEGs or to serve other purposes. Here are some of them.
PNG (.PNG)
PNG (Portable Network Graphics), pronounced "ping," was developed to replace the aging GIF format and is supported by both Microsoft Internet Explorer and Netscape Navigator. PNG, like GIF is a lossless format, but it has some features that the GIF format doesn't. These include 254 levels of transparency (GIF supports only one), more control over image brightness, and support for more than 48 bits per pixel. (GIF supports 8 for 256 colors). PNG also supports progressive rendering, as interlaced GIFs do, and tends to compress better than a GIF. The format has never caught on and remains a curiosity on the Web.
EPS (.EPS)
EPS (Encapsulated PostScript) files, pronounced a letter at a time "E-P-S," use a format developed by Adobe for PostScript printers. These files generally have two parts. The first is a text description that tells a PostScript printer how to output the image. The second is an optionally bit-mapped PICT image for on-screen previews. Once an image has been saved in the EPS format, you can import it into other programs and scale and crop it. However, its contents are often no longer editable except by a few programs such as Adobe Illustrator. For this reason, these files are generally created at the end of the process when they are about to be incorporated into a printed publication.
GIFs (.GIF)
GIF (Graphics Interchange Format) format images, pronounced "jiff," are widely used on the Web but mostly for line art, not for photographic images. This format stores up to 256 colors from an image in a table called a palette. Since images have millions of colors, a program such as Photoshop selects the best ones to represent the whole when you save the image in this format. When displayed, each pixel in the image is then displayed as one of the colors from the table, much like painting by numbers.
There are two versions of GIF in use on the Web; the original GIF 87a and a newer GIF 89a. Both versions can use interlacing; storing images using four passes instead of one. Normally, when an image is displayed in a browser, it is transmitted a row at a time starting at the top row and filling in down the page. When saved as an interlaced GIF, it is first sent at its full size but with a very low resolution. This allows a person to get some idea of all of the contents of the image file before it is completely transmitted. As more pixels are sent in the next three passes the image fills in and eventually reaches its full resolution. The newer GIF 89a version adds some additional capabilities that include the following:
- Image backgrounds can be made transparent. To do so, you specify which color in the table is to be transparent. When viewed with a Web browser, the browser replaces every pixel in the image that is this color with a pixel from the web page's background. This allows the background to show through the image in those areas. You have to choose the transparent color carefully. If you select one that occurs anywhere in the image besides the background, your image will appear to have "holes" in it.
- Images can be animated. By rapidly "flipping" through a series of images, objects can be animated much as a movie simulates motion using a series of still images. This works best with line drawings but can also be done with photographs. Depending on bandwidth, the animation may not work the first time. However, once it's stored in cache and replayed, it will work fine.
GIF images are limited to a maximum of 256 colors. These colors, stored in a table, index, or palette, are often referred to as indexed colors. When you convert a photograph to GIF format, most graphics programs will allow you to dither it. This replaces lost colors with patterns of those available in the palette. Dithering improves the appearance of the image, but it also increases the size of the file. Although GIF photographs often look OK on-screen, they suffer if compared side-by-side with images saved in JPEG and other formats. The GIF format is best used for line art such as cartoons, graphs, schematics, logos, and text that have a limited number of colors and distinct boundaries between color regions. GIF images are compressed using a "lossless" form of compression called LZW (Lempel-Ziv-Welch). The amount of compression achieved depends on the frequency of color changes in each pixel row. This is because when two or more pixels in a row have the same color, they are recorded as a single block. Hence, a picture of horizontal stripes will compress more than one of vertical stripes, because the horizontal lines would be each stored as a single block. Photographs with large areas of identical colors such as skies, snow, clouds, and so on, will compress more than images with lots of colors and patterns.? To save a 24 bit image as a GIF, you must reduce the bit depth down to 8 bits. To reduce file sizes in GIF format, you can further reduce the number of colors in the image. This is difficult with most photographs, but not with line art. For example, if your image has 16 or fewer colors, you can convert it to a 4-bit (16-color) palette. Most graphics programs will allow you to do this. Even with photographs you can sometimes reduce the image to fewer colors than actually exist without noticeable loss. The discarded colors are those that are seldom-used or transitional colors between more frequent colors. When working with grayscale images, GIF works as well as JPEG because almost all programs use 8-bits (256 colors) for gray scale images.
5 Sharpening Images
Most photos captured with a digital camera or a scanner contain some blur that can be corrected using a process called unsharp masking (USM). In fact, the need for this process is so common, many high-end cameras and scanners have embedded software that does it automatically. Even if it's been done once to an image, it may have to be done again if you resample the image. You'll find that this procedure, done with an Unsharp Mask filter can make a tremendous difference in photos that you print or post on the Web.
So how does the Unsharp Mask filter work? First it locates edges in the image by looking for pairs of adjacent pixels that have a specified difference in brightness (threshold) and increases the contrast of those pixels by a specified amount. The change affects not only the pair of pixels, but also any that fall within a specified radius.
�E The threshold is the difference in brightness between two pixels before they are considered edge pixels and are sharpened by the filter. If you set the threshold value to 0,? all pixels in the image will be sharpened. In some cases, such as images with flesh tones, this can introduce noise. In these cases, you might want to experiment with higher thresholds, perhaps between 2 and 20.
�E The amount is the percentage which contrast of the edge pixels is increased. A good starting point is around 100%.
�E The radius is the number of pixels around the edge that are sharpened. To begin, you might try a radius between 1 and 2 pixels.
When sharpening an image, keep in mind that the effects of the Unsharp Mask filter are more obvious on the screen than in high-resolution output. To get a feeling for the effects, do some experiments and sample printouts to see what settings work best for you.
 |
| An unsharpened image of a subflower blossom. |
 |
| Sharpened image. |
| TIP: Colors too Saturated
If the Unsharp Mask filter makes bright colors in your image look too saturated, you can sharpen the image without affecting the color components. To do so, convert the image to LAB mode and then apply the filter only to the L channel. In LAB mode the lightness and darkness information is in a channel separate from the color information so you can apply the Unsharp Mask filter only to that channel. Since this doesn't effect the color information, you can sharpen an image more. |
6 Resizing Images
The size of an image is measured by the number of pixels it contains. To reduce an image, you reduce the number of pixels in it. To enlarge and image, you add pixels. Both of these processes are referred to as resizing the image. Reducing an image almost always has less affect on its appearance than does enlarging one. This is because, enlarging requires the program to add pixels.To do so, the computer analyzes adjoining pixels to determine the color of any new ones it inserts. Normally, you can double the size of an image without effects showing. However, trial and error is usually the only way to see because images vary so much.
 |
200 x 133 pixels |
 |
100 |
7 Cropping Images
Great photographers try to compose, capture, and then print images full-frame. However, editors and others love to crop images to fit unusual shapes in layouts, or to make the image more dramatic. It's like looking for a better photograph within a photograph. At other times, you crop to straighten a horizon line, remove distracting elements, or enlarge small portions.
To evaluate an image for cropping, make a printout . Then cut two "L" shapes from a piece of paper or cardboard large enough to cover the photograph you're evaluating. By arranging the L's in various configurations, and size and shape rectangle can be formed to isolate a portion of the image. When you decide how you want to crop, mark straight lines onto the print to use as a guide when cropping in your photo editing program.
As with film photography, cropping reduces the area of the image to be enlarged. The greater the enlargement, the more blur, grain, and other faults show. Try to shoot images full-frame so you don't have to crop them later. Professionals have always tried to so this, and it's only in photojournalism and the graphic arts where a lot of cropping goes on as editors and designers look for images within images.
 |
| The original image has too much dark space around the center of interest. |
 |
Cropping, cuts out the dark areas, leaving just the interestin |
8 Rotating Images
If an image becomes rotated in the frame during capture or scanning, you can rotate it back to a vertical or horizontal position. When you use this command, you'll always loose a part of the image when you crop the edges to make the edges of the rotated image square or rectangular again.
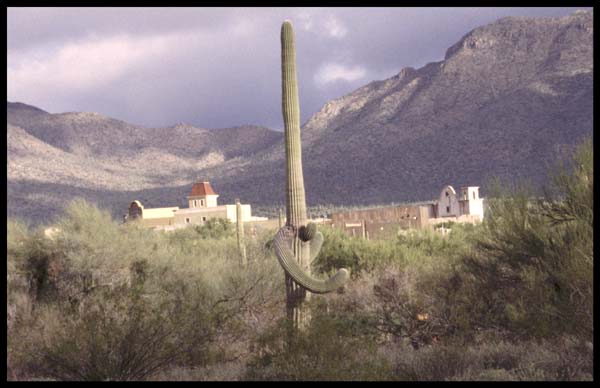 |
| The horizon line in front of the mountains is slightly tilted as is the tall cactus in the foreground. |
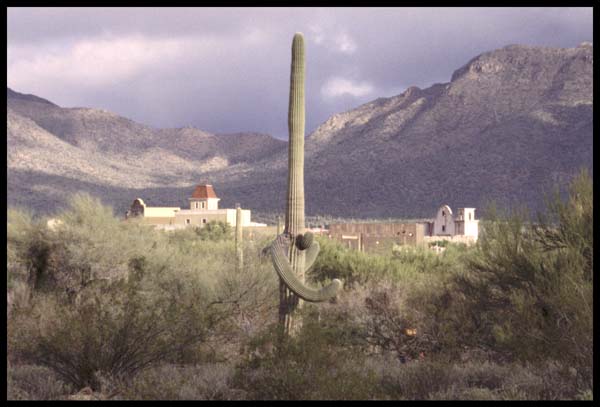 |
| The rotation command has been used to level the image. |
10 Adjusting Color Balance
Color balance (or hue balance) can change the relationships of the red, green, or blue channels to make the colors in an image more accurate or more different.
 |
| The original image has a gray cast to it. |
?
 |
| By adjusting color balance, the image is given a more surrealistic look. |
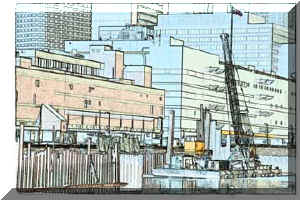
12 Using Filters
Since one of the most interesting things to do with digital images is to manipulate them, be sure to look into filters. Many of this like the unsharp filter are used to make your images look more like the original scene. But many others can make photos looks like paintings, stained glass windows, or hundreds of other objects. The can emboss images, add textures, twist and twirl them, and create all kinds of creative havoc. They are easy to use, you just select the command and sit back and watch your computer go to work. If you don't like the result, just click the undo command and try another filter. And don't stop with just one filter, use two or more in succession on the same image and watch as it moves further and further from reality. Many photo editing programs come with filters built-in, but some programs allow to to purchase separate plug-ins to expand your library of effects from which to choose.
 |
 |
 |
| This photograph of a mission in Arizona has been filtered to make it look like a watercolor painting. |
Editing Your Images
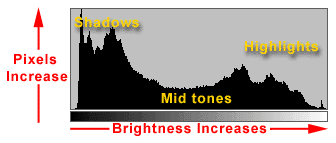
14 Understanding HistogramsMost serious photo-editing programs such as Photoshop and Picture Window let you use a histogram as a guide when editing your images. Since most image corrections can be diagnosed by looking at a histogram, it helps to look at it while still in a position to reshoot the image. It's for this reason that histograms can be displayed on the monitor of some high-end digital cameras. As you've seen, each pixel in an image can be set to any of 256 levels of brightness from pure black (0) to pure white (255). A histogram is a graph that shows how the 256 possible levels of brightness are distributed in the image.
- The horizontal axis represents the range of brightness from 0 (shadows) on the left to 255 (highlights) on the right. Think of it as a line with 256 spaces on which to stack pixels of the same brightness. Since these are the only values that can be captured by the camera, the horizontal line also represents the camera's maximum potential dynamic range.
- The vertical axis represents the number of pixels that have each one of the 256 brightness values. The higher the line coming up from the horizontal axis, the more pixels there are at that level of brightness.
To read the histogram, you look at the distribution of pixels. An image that uses the entire dynamic range of the camera will have a reasonable number of pixels at every level of brightness. An image that has low contrast will have the pixels clumped together and have a narrower dynamic range.
The way a histogram looks depends on the scene your are shooting and how you expose it. There's no such thing as a good or bad histogram. Whether a particular histogram is good or bad depends on what you are trying to accomplish. If fact, you may prefer to trust your visual reaction to the image more than the very numeric image data provided by a histogram. However, even if you never use it, you can learn about digital images by understanding what a histogram can shows about an image. Here are some histograms from good images along with a brief summary of what the histogram reveals.
 |
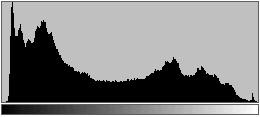 |
| In this typical well exposed portrait there is a fairly even distribution of values in both the shadow and highlight areas of the image. One thing you can see immediately from the histogram is that there are no pure blacks in the image. This is shown by the gap at the far left end of the scale. | |
?
 |
 |
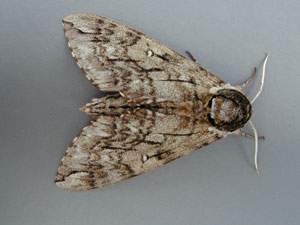
| This brown moth on a gray card has most of its values in the midrange. That's why there is a number of high vertical lines grouped in the middle of the horizontal axis. | |
?
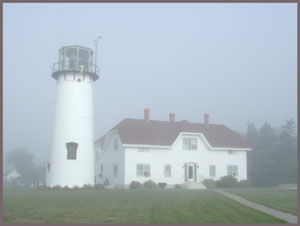 |
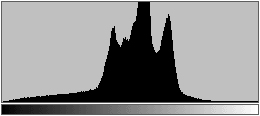
 |
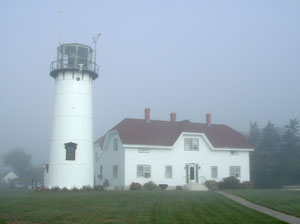
| This high-key fog scene has most of its values towards the highlight end of the scale. The distinct vertical line to the left of middle gray shows how many pixels there are in the uniformly gray frame border (which I added in Photoshop). You can see that there are no really dark values in the image. In fact, the image uses only a little more than half the camera's dynamic range. | |
?
 |
 |
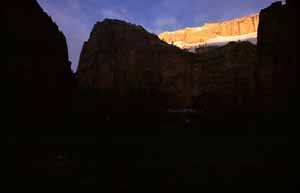
| This low-key scene has the majority of its values in the shadow area with another large grouping around middle gray. There are wide levels of brightness that have only a few pixels. | |
?
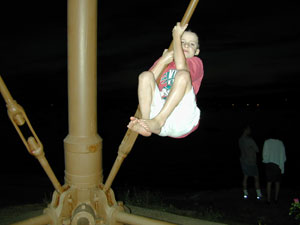 |
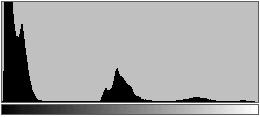
 |
| This night scene with flash has a lot of dark pixels but then there are other values fairly evenly distributed across the entire range. | |
One reason to check a histogram is to see if there is enough detail in the shadow, midtone, and highlight areas. If there is enough detail, even if the image is somewhat off, it can be corrected in a program such as Photoshop using the Levels command or in Picture Window using the Brightness Curve. These controls allow you to adjust the shadow, mid, and highlight areas independently without affecting the other areas. This lets you lighten or darken selected areas of your images without loosing detail.
From the histogram you can determine the image's darkest shadow and brightest highlights; called the black point and white point. In fact, it's the range between these two points that defines the dynamic range (also called the tonal range, or contrast) of the image. If the image is low contrast, you can also tell if it's low-key or high-key from the histogram. A low key image has details concentrated at the dark end of the scale. A high-key image has them concentrated at the light end.
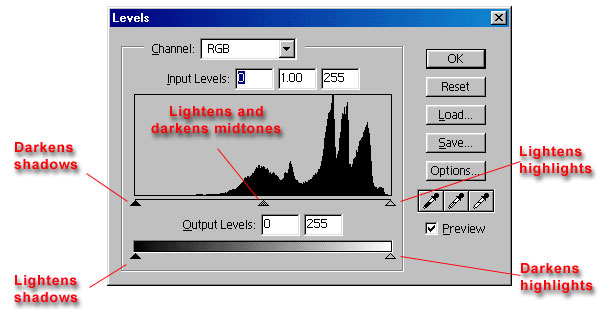
In Photoshop the Levels dialog box gives you five dragable triangles to adjust the distribution of brightness in your image.
The three dragable triangles below the histogram work as follows:
- Dragging the left (black) triangle to the right darkens the shadows.
- Dragging the right (white ) triangle to the left lightens the shadows.
- Dragging the middle triangle to the left or right lightens or darkens the image.
The two dragable triangles below the Output Levels grayscale bar also adjust the image, having almost the opposite affect of the triangles above.
- Dragging the left (black) triangle to the right lightens the shadows.
- Dragging the right (white ) triangle to the left darkens the highlights.
 |
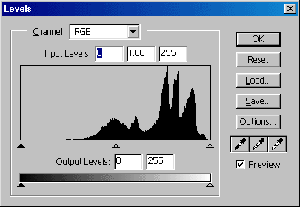 |
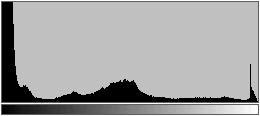
| In this image the histogram shows there are no pixels at the shadow end of the scale. Blacks will looked washed out. Underneath the histogram are three dragable points. The far left is dragged to set the black point, the right to set the white point, and the middle one to set middle gray. | |
?
 |
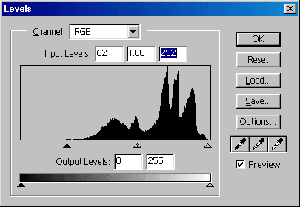 |
| By dragging in the black point marker (above right) to where the first pixels appear, the dynamic range will be expanded so there are pure blacks in the image. The histogram for the corrected image (right) now shows that the dynamic range has been "stretched" so there are pixels at all levels of brightness. The fact that you can't see changes in the image itself is because at these reduced sizes they don't show. This is just a draft of this section so I'll try to find a better example. |  |
?